深入Atlas系列:Web Sevices Access in Atlas(3) - 服务器端支持(下)
2006-10-11 15:22 by 老赵, 3032 visits我们知道,处理Web Services方法请求的Handler是RestHandler,所以我们来看一下它的ProcessHandler方法:
1 public void ProcessRequest(HttpContext context)
2 {
3 // 根据Web Services的Cache设置来配置Cache策略
4 this.InitializeCachePolicy(context);
5
6 try
7 {
8 string contentType;
9
10 // 从body的JSON字符串中得到输入的参数。
11 IDictionary<string, object> inputParams = this.GetRawParams(context);
12
13 // this._webServiceMethodData.Ower.Type即获得了即将调用的那个
14 // Web Service类,通过Activator.CreateInstance方法构造实例。
15 object serviceObj = Activator.CreateInstance(this._webServiceMethodData.Owner.Type);
16
17 // 这是一段很有技巧的代码,我们目前不去分析它。
18 DataService service = serviceObj as DataService;
19 if (service != null)
20 {
21 service.IsCalledRemotely = true;
22 }
23
24 // Call这个Web Service方法来得到结果
25 object resultObj = this._webServiceMethodData.CallMethodFromRawParams(serviceObj, inputParams);
26
27 ……
28 }
29 catch (Exception e)
30 {
31 ……
32 }
33 }
首先调用InitializeCachePolicy方法来处理缓存策略,代码很短也很简单,因此不多解释了。其次查看serviceObj是否是DataService类型,如果是的话则将IsCalledRemotely设为ture,这是比较有技巧的做法,我们目前不去分析它。接着通过GetRawParams方法方法获得以Dictionary方式存放的参数,我们需要看一下它的框架,可以了解它获得参数的方法。
1 private IDictionary<string, object> GetRawParams(HttpContext context)
2 {
3 // 如果是Cross Domain Access,则抛出异常
4 if (!this._webServiceMethodData.SafeForCrossDomain && ChildRequest.IsCrossDomainRequest(context))
5 {
6 throw new InvalidOperationException(
7 string.Format(
8 CultureInfo.CurrentCulture,
9 AtlasWeb.InvalidCrossDomainRequest,
10 new object[] { this._webServiceMethodData.MethodInfo.Name }));
11 }
12
13 // 如果使用HTTP POST方法
14 if (context.Request.HttpMethod == "POST")
15 {
16 // 则通过Body中的JSON代码获得参数
17 return this.GetRawParamsFromPostRequest(context);
18 }
19
20 // 由于使用了HTTP GET方法,需要看一下Web Services方法是否允许GET操作
21 if (!this._webServiceMethodData.GetVerbEnabled)
22 {
23 throw new InvalidOperationException(
24 string.Format(
25 CultureInfo.CurrentCulture,
26 AtlasWeb.InvalidGetRequest,
27 new object[] { this._webServiceMethodData.MethodInfo.Name }));
28 }
29
30 // 从Query String中获得参数
31 return this.GetRawParamsFromGetRequest(context);
32 }
一个Web Service方法,可以使用Microsoft.Web.Services.WebOperationAttribute来标记是否使用能够通过GET方法访问。下面的代码让该Web Service方法允许使用GET方法来访问:
获得的Dictionary数据结构以Key - Value的方式对应的参数名和表示参数值的字符串,如果是复杂类型的话会产生许多层的Dictionary或List,大家应该能够想象出来它是什么样子,因为这和大名鼎鼎的JSON非常相似!获得参数之后,会将其传入WebServiceMethodData的CallMethodFromRawParams方法,以获得方法执行的结果。
WebServiceMethodData.CallMethodFromRawParams方法代码如下:
1 internal object CallMethodFromRawParams(object target, IDictionary<string, object> parameters)
2 {
3 // 获得强类型的参数字典
4 parameters = this.StrongTypeParameters(parameters);
5 return this.CallMethod(target, parameters);
6 }
首先通过StrongTypeParameters方法来获得一个强类型的参数字典,它不会有多层的Dictionary或List。此方法非常的复杂,在这里就先不进行分析了,有兴趣的朋友可以先看一下相关代码,我会在今后的文章中分析这些代码的细节,它们还是写得非常优秀的。得到强类型的参数后,就会使用CallMethod来调用方法得到结果了。在这里面只是使用了简单的Reflection,相信大家也能够想象得到个中实现。
接下来就要输出结果了,代码如下:
1 public void ProcessRequest(HttpContext context)
2 {
3 ……
4
5 try
6 {
7 ……
8
9 // 如果这个Web Service方法被要求使用XML作为Response
10 if (this._webServiceMethodData.UseXmlResponse)
11 {
12 // 如果result是String,那么直接输出
13 if (resultObj is string)
14 {
15 body = (string) resultObj;
16 }
17 else if (resultObj is XmlNode)
18 {
19 // 如果是一段XML,则输出它的OuterXml
20 body = ((XmlNode) resultObj).OuterXml;
21 }
22 else // 如果只是一个普通的对象
23 {
24 try
25 {
26 // 使用XmlSerializer来序列化对象
27 body = ServicesUtilities.XmlSerializeObjectToString(resultObj);
28 }
29 catch (Exception e)
30 {
31 throw new InvalidOperationException(
32 string.Format(
33 CultureInfo.CurrentCulture,
34 AtlasWeb.InvalidXmlReturnType,
35 new object[] {
36 this._webServiceMethodData.MethodInfo.Name,
37 resultObj.GetType().FullName,
38 e.Message
39 }
40 )
41 );
42 }
43 }
44
45 // contentType为"text/xml"
46 contentType = "text/xml";
47 }
48 else // 如果不以Xml输出
49 {
50 // 那么以JSON方式输出
51 body = JavaScriptObjectSerializer.Serialize(resultObj, this._webServiceMethodData.Owner);
52 // contentType为"application/json"
53 contentType = "application/json";
54 }
55
56 // 设置ContentType
57 context.Response.ContentType = contentType;
58 // 输出body
59 if (body != null)
60 {
61 context.Response.Write(body);
62 }
63 }
64 catch (Exception e)
65 {
66 ……
67 }
68 }
要设置该Web Services方法的输出方式为XML(UseXmlResponse == true),则也是需要使用Microsoft.Web.Services.WebOperationAttribute来标记方法,如下:
后面会有一个例子来演示这一点。如果该方法被标记使用XML方式输出,则会判断结果类型。如果是字符串则直接输出;如果是Xml类型的结果,则输出它的OuterXml;最后则会尝试使用XmlSerializer来序列化这个对象。
在默认情况下,该对象会被JSON序列化输出,这就是我们最常见的做法。
最后,对于异常情况,也需要进行输出。代码如下:
1 public void ProcessRequest(HttpContext context)
2 {
3 ……
4
5 try
6 {
7 ……
8 }
9 catch (Exception e)
10 {
11 // 输出异常信息
12 context.Response.ClearHeaders();
13 context.Response.Clear();
14 // Status Code设为500
15 context.Response.StatusCode = 500;
16 context.Response.StatusDescription = HttpWorkerRequest.GetStatusDescription(500);
17 using (StreamWriter writer = new StreamWriter(context.Response.OutputStream, new UTF8Encoding(false)))
18 {
19 // 以JSON方式输出异常信息
20 RestHandler.WriteExceptionJsonString(context, writer, e);
21 return;
22 }
23 }
24 }
代码使用RestHandler.WriteExceptionJsonString来分别输出异常的Message,StackTrace和异常的FullName。在代码里可以使用这一点。
到现在为止,可以说Atlas在服务器端对于Web Services的支持代码已经分析完了。我们通过两个实例来详细理解这一点。
范例1:在Web Services方法中使用复杂的数据类型。
首先,我们定义两个表示数据的类,Employee和Company。代码如下:
1 [Serializable]
2 public class Employee : IComparable<Employee>
3 {
4 public string Name;
5
6 public int Age;
7
8 #region IComparable<Employee> Members
9
10 public int CompareTo(Employee other)
11 {
12 return this.Name.CompareTo(other.Name);
13 }
14
15 #endregion
16 }
17
18 [Serializable]
19 public class Company
20 {
21 public string Name;
22
23 public Employee[] Employees;
24 }
接着我们定义一个Web Services方法Sort,该方法的作用是拿到公司姓名和一个Employee数组作为参数,将Employee按照姓名排序之后,再组成一个Company对象输出。代码如下:
1 [WebService(Namespace = "http://tempuri.org/")]
2 [WebServiceBinding(ConformsTo = WsiProfiles.BasicProfile1_1)]
3 public class ComplexTypeWS : System.Web.Services.WebService {
4
5 [WebMethod]
6 public Company Sort(string companyName, Employee[] employees)
7 {
8 Array.Sort<Employee>(employees);
9
10 Company company = new Company();
11 company.Name = companyName;
12 company.Employees = employees;
13 return company;
14 }
15 }
然后就是HTML了。在页面最上方(id为employees的div)会显示内存中目前所有的Employee,之后是向内存中添加Employee的输入框,接着是填写公司名的文本框和排序按钮,最后则是经过了Web Services排序后的结果显示区域(id为sortedDisplay的div):
1 <body style="font-family:Verdana; font-size: 14px;">
2 <form id="form1" runat="server">
3 <atlas:ScriptManager runat="server" ID="ScriptManager1" />
4
5 <div>Employees:</div>
6 <div id="employees"></div>
7 <hr />
8 <div>Add Employee:</div>
9 <div>Name: <input type="text" id="empName" /></div>
10 <div>Age: <input type="text" id="empAge" /></div>
11 <input type="button" value="Add employee" onclick="addEmployee()" /><br />
12 <hr />
13 <div>Company Name:<input type="text" id="companyName" /></div>
14 <input type="button" value="Sort!" onclick="sort()" /><br />
15 <hr />
16 <div id="sortedDisplay"></div>
17 </form>
18 </body>
最后我们来看Javascript代码:
1 <script language="javascript">
2 // 内存中的Employee数组
3 var empArray = new Array();
4
5 // 添加一个Employee
6 function addEmployee()
7 {
8 // 建立一个对象表示Employee
9 var emp = new Object();
10 emp.Name = $('empName').value;
11 emp.Age = parseInt($("empAge").value, 10);
12
13 // 加入数组
14 empArray.push(emp);
15
16 // 更新最上方的显示
17 updateSource();
18 }
19
20 // 将内存中的empArray数组显示在id为employee的div中
21 function updateSource()
22 {
23 var html = "";
24
25 for (var i = 0; i < empArray.length; i++)
26 {
27 var emp = empArray[i];
28 html += ((i + 1) + ". " + emp.Name + ", " + emp.Age + " years old.<br />")
29 }
30
31 $("employees").innerHTML = html;
32 }
33
34 // 访问Web Service进行排序
35 function sort()
36 {
37 // 构造参数
38 var params = { "companyName" : $("companyName").value, "employees" : empArray };
39 // 构造Web Service方法访问对象
40 var method = new Sys.Net.ServiceMethod("ComplexTypeWS.asmx", "Sort", null);
41
42 // 调用Web Service方法
43 method.invoke(params, onMethodComplete);
44 }
45
46 // 回调函数
47 function onMethodComplete(company, response, userContext)
48 {
49 // 在id为sortedDisplay的div中显示所有的Employee,
50 // 可以发现company对象和服务器端对象的结构相同
51 var html = "Company Name: " + company.Name;
52 for (var i = 0; i < company.Employees.length; i++)
53 {
54 var emp = company.Employees[i];
55 html += ("<br />" + (i + 1) + ". " + emp.Name + ", " + emp.Age + " years old.")
56 }
57
58 $("sortedDisplay").innerHTML = html;
59
60 // 清空内存中的Employee
61 empArray.length = 0;
62 // 更新最上方的显示
63 updateSource();
64 }
65 </script>
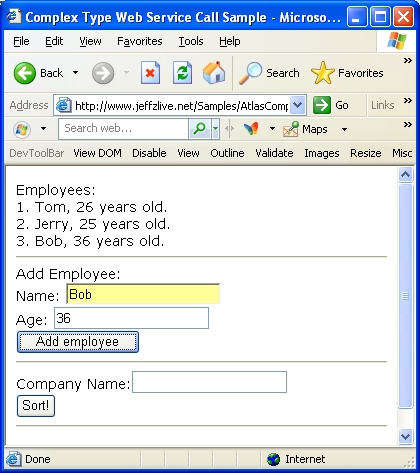
所有的代码都在这里,我们来看一下使用。首先打开页面,输入数个Employee,如图:
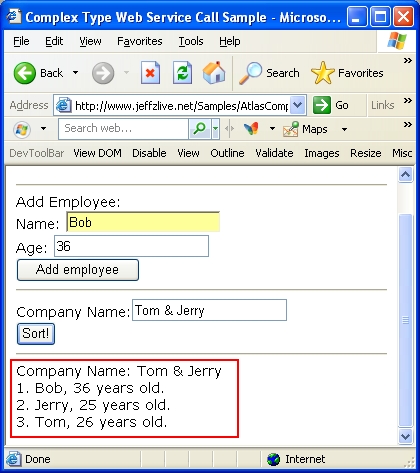
然后点击填写好Company Name并点击Sort按钮,则可以看出按照姓名排序后的结果:
我们使用Fiddler查看一下数据传输,可以看到Request Body和Response Body里的JSON代码:
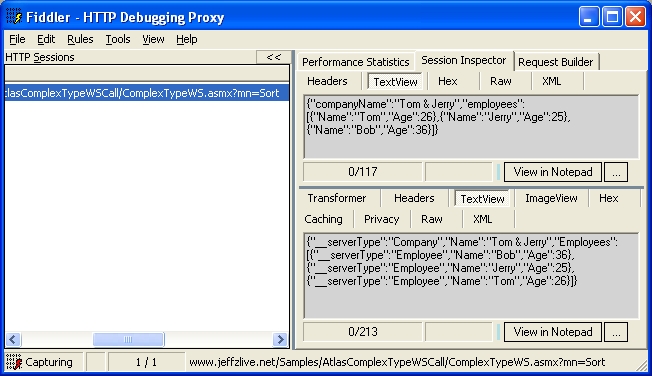
可以看出,Atlas使用了JSON方式传递数据非常的直观,对于复杂的类型支持也非常好。在客户端得到的对象,其结构和服务器端相同,这对于开发人员带来了不小的便利。
范例2:使用Web Services将对象序列化成XML并使用客户端XSLTView空间输出信息
使用了与上例相同的Employee和Company两个类,在这里就不重复了,先来看一下Web Service方法GetXmlSerializedCompany的代码:
1 [WebService(Namespace = "http://tempuri.org/")]
2 [WebServiceBinding(ConformsTo = WsiProfiles.BasicProfile1_1)]
3 public class ComplexTypeWS : System.Web.Services.WebService {
4
5 [WebMethod]
6 [WebOperation(false, ResponseFormatMode.Xml)]
7 public Company GetXmlSerializedCompany(Company company)
8 {
9 return company;
10 }
11 }
这个方法简单地令人惊讶,只是直接将参数返回。其精妙之处就是使用了Microsoft.Web.Services.WebOperationAttribute进行标记,表明了该方法将以XML形式输出。
接下来是HTML,与上例非常的相似,就不多作解释了。代码如下:
1 <atlas:ScriptManager ID="ScriptManager1" runat="server" />
2
3 <form id="form1" runat="server">
4
5 <div>Employees:</div>
6 <div id="employees"></div>
7 <hr />
8 <div>Add Employee:</div>
9 <div>Name: <input type="text" id="empName" /></div>
10 <div>Age: <input type="text" id="empAge" /></div>
11 <input type="button" value="Add employee" onclick="addEmployee()" /><br />
12 <hr />
13 <div>Company Name:<input type="text" id="companyName" /></div>
14 <input type="button" value="Serialize!" onclick="serialize()" /><br />
15 <hr />
16 <div id="xmlDisplay"></div>
17
18 </form>
然后准备一下Atlas Xml Script,声明一个XmlDataSource,用来获得XSLT文件。再添加一个XSLTView,将其transform属性与XmlDataSource的document属性绑定起来。代码如下:
1 <script type="text/xml-script">
2 <page>
3 <components>
4 <xmlDataSource id="xsltSource" autoLoad="true" serviceURL="Company.xsl" />
5 <xsltView id="xmlDisplay">
6 <bindings>
7 <binding property="transform" dataContext="xsltSource" dataPath="document" />
8 </bindings>
9 </xsltView>
10 </components>
11 </page>
12 </script>
顺便给出Company.xsl文件代码:
1 <?xml version="1.0" encoding="utf-8"?>
2 <xsl:stylesheet version="1.0" xmlns:xsl="http://www.w3.org/1999/XSL/Transform">
3 <xsl:template match="/Company">
4 <div>
5 Company:
6 <xsl:value-of select="Name" />
7 </div>
8 <xsl:for-each select="Employees/Employee">
9 <div>
10 <xsl:value-of select="Name" />
11 <xsl:text>, </xsl:text>
12 <xsl:value-of select="Age" />
13 <xsl:text> years old.</xsl:text>
14 </div>
15 </xsl:for-each>
16 </xsl:template>
17 </xsl:stylesheet>
然后是Javascript代码,大部分与上例相同,只作了少量注释:
1 <script language="javascript">
2 var empArray = new Array();
3
4 function addEmployee()
5 {
6 var emp = new Object();
7 emp.Name = $('empName').value;
8 emp.Age = parseInt($("empAge").value, 10);
9
10 empArray.push(emp);
11 updateSource();
12 }
13
14 function updateSource()
15 {
16 var html = "";
17
18 for (var i = 0; i < empArray.length; i++)
19 {
20 var emp = empArray[i];
21 html += ((i + 1) + ". " + emp.Name + ", " + emp.Age + " years old.<br />")
22 }
23
24 $("employees").innerHTML = html;
25 }
26
27 function serialize()
28 {
29 // 构造一个Company对象作为参数,
30 // 结构和服务器端对象相同。
31 var company = new Object();
32 company.Name = $("companyName").value;
33 company.Employees = empArray;
34
35 var params = { "company" : company }
36 var method = new Sys.Net.ServiceMethod("ComplexTypeWS.asmx", "GetXmlSerializedCompany", null);
37
38 method.invoke(params, onMethodComplete);
39 }
40
41 function onMethodComplete(resultXml, response, userContext)
42 {
43 // 这时第一个参数是一个Xml,
44 // 用它来设置XSLTView的document属性。
45 $("xmlDisplay").control.set_document(resultXml);
46
47 empArray.length = 0;
48 updateSource();
49 }
50 </script>
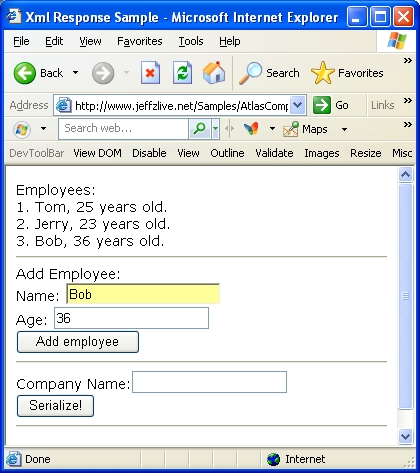
代码就是这些,接下来看一下使用。首先依旧是添加数个Employee:
填写Company Name并点击“Serialize!”按钮,可以看到下方的XSLT输出:
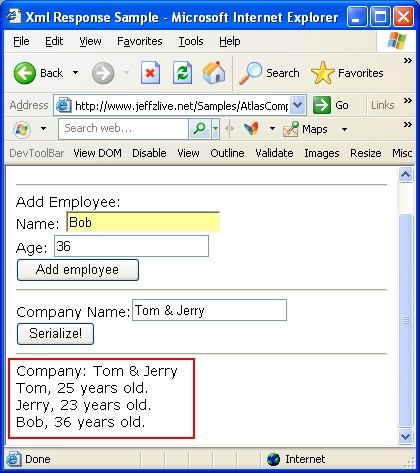
使用Fiddler查看的Request Body和Response Body的信息:
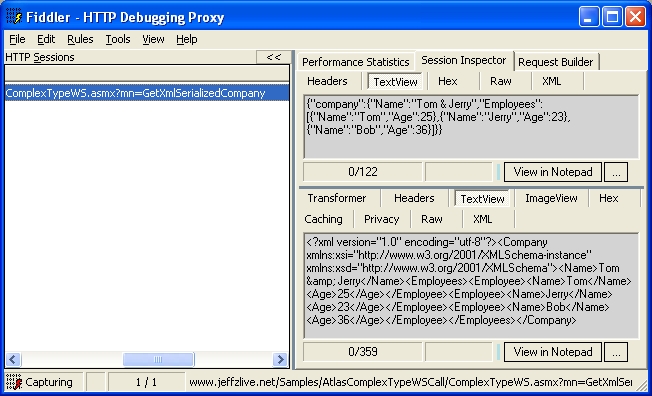
正如我们所期望的那样,Response Body里的信息是Company对象被Xml序列化之后的结果,然后使用XSLT转换后即得到了我们需要的信息!
通过了上面两个例子,我们可以看出Atlas对于Web Services的支持是非常灵活的。具体的使用方式让开发人员有很大的发挥空间,开发人员完全可以选择合适的方式把Atlas灵活运用在自己的项目中。
当然,Atlas对于Web Services的支持还远不止这些,在以后的文章里我会继续从实现角度对Atlas的Web Services进行分析,并提供更多的范例给大家参考。希望大家支持我的“深入Atlas系列”,谢谢大家。
点击这里下载两个范例的代码。
点击这里查看“在Web Services方法中使用复杂的数据类型”效果
点击这里查看“使用Web Services将对象序列化成XML并使用客户端XSLTView空间输出信息”效果


增加了两个范例,希望能对大家有所帮助,也希望能增加我文章的吸引力。:)